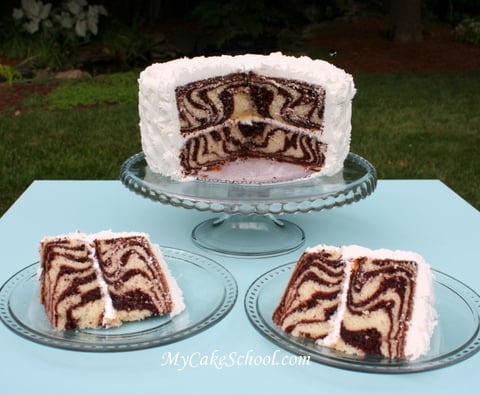
Photo from MyCakeSchool.com
Last week I came across a recipe for beautiful cake that is a great alternative to the classic 'swirl' cake, you know, the one where you pull the knife through the chocolate and vanilla cake. This one caught my eye because it looks so professional and I knew I had to try it!
Well, it uses boxed cake mix, and I didn't have chocolate or vanilla, so it was attempted with red velvet--big mistake. The red overtook everything.
I'm planning on trying it again and will post an update.
In the mean time, you can find the step-by-step instructions here (albeit they're a little confusing, I'll post my updated one once it's done!
Wednesday, January 30, 2013
Wednesday, January 2, 2013
Cherry Almond Crisp (adapted from the Pioneer Woman)
A few weeks ago I was inspired to make this cherry almond crisp after viewing it on The Pioneer Woman (a FoodNetwork show). I came across a lot of individuals who were unable to find tart cherries in their stores. From what research I did it seems that if you don't like in California, you'll have to pay exorbitant fees to have tart cherries shipped to you.
So, I have been playing around with this recipe to incorporate the sweet cherries I find in the frozen section of the grocery store. Here is my ADAPTED recipe:
- FOR THE CRUMB MIXTURE:
- 1/2 cup All-purpose Flour
- 1/4 cup Sugar
- 1/4 cup Packed Brown Sugar
- 1/2 teaspoon Cinnamon
- 1 dash Nutmeg,
- 1/4 teaspoon Salt
- 3/4 stick Cold (salted) Butter, Cut Into Pieces
- 1/2 cup Sliced Almonds
- FOR THE FILLING
- 1 bags frozen sweet cherries
- 1/2 cup fresh cranberries
- 1/4 cup White Sugar
- 1/4 cup Cornstarch
- 1 teaspoons Almond Extract
- BASIC WHIPPED CREAM
- 2 cups Heavy Cream
- 2 Tablespoons Powdered Sugar
Preheat oven to 350 F.
Combine the flour, granulated sugar, brown sugar, cinnamon, nutmeg and salt in a bowl and set aside.
In a separate bowl, cut the cold butter into small pieces then further break these pieces up with your hand. Combine this with the sliced almonds.
Place the FROZEN (don't let them thaw) cherries in a bowl, and add sugar, cornstarch and almond extract and stir.
Place the cherries into an unprepared ramekin (I used an oblong one which is about 4 inches wide by 9 inches long). Top with the flour mixture you prepared earlier and add the butter/almond mixture.
Bake at 350 F for 45 minutes, or until the topping is crisp and golden brown. If the topping appears underdone broil for just a minute or so.
For the whipped cream...
Add heavy cream and powdered sugar with a whisk and beat until light and fluffy (you can add some meringue powder to maintain consistency if you plan to store it for a few days).
Friday, December 28, 2012
Thursday, December 27, 2012
No-Melt! Strawberry Santas that Won't Melt!
These little guys were an absolute hit at a holiday party this year. As many of you know, when you're entertaining with lots of guests a cream cheese mixture is sure to melt and lose its form. Here is my simple solution to that problem: meringue powder. I added a touch of this to my recipe and my Santas looked like Santas all night (instead of melting snowmen). Did I mention they're delicious?
Ingredients:
1 pound strawberries, cut and slightly cored
8oz soft cream cheese
4 tablespoons powdered sugar
3 tablespoons meringue powder (find it at easily at Michaels or at Amazon.com)
Black sprinkles (I had them from a Halloween mix)
Mix together 8oz soft cream cheese with 4 tablespoons of powdered sugar with a mixer. Next, add about 3 tablespoons of meringue powder. Finally, place this filling in a sandwich bag and cut out a small corner to pipe. Pipe the mixture into prepared strawberries (1lb.). I did not core the strawberries to the very bottom so that I would avoid having a messy dish as guests took their Santas. I use black sprinkles for eyes.
Merry Christmas!
Nail Care -Gel Nails
For those of you who use gel nail polish (I'm a fan of Nailene Gel sets) you know the toll they take on your nails. I've always thought of Neutrogena hand lotion as a good fix for winter hands, but after receiving some through BzzAgent, I realized how well it repairs my nails after a gel manicure. My nails are soft, smooth, and they can finally go without polish! Now, with this Neutrogena product I'm happy to show off my manicure even in the blistering cold of winter.
I recommend putting this on at night followed by cosmetic gloves as it can be a little sticky.
Take a look!
Tips for a perfect manicure:
-First, make sure you nails are clean and have healed. I remove my nailpolish and then allow my nails to heal for a day or two. During these days I use Neutrogena on my nails and I also put olive oil and coconut oil on when I have a chance.
-When you're ready to apply the gel manicure make sure to clean the nails well with rubbing alcohol and soap to remove any residue.
--Very important! If you want your manicure to last, make sure you do the three swipes of polish (middle, left, right) followed by a swipe across the top of the nail. Covering the end of your nail with polish will prevent chipping!
Here is the finished product--I was finally able to do only a single gel clear coat without cracks!
Saturday, December 1, 2012
All Natural Homemade Sugar Scrub Gift
| Image from Jac o'lyn Murphy |
The following ingredients are needed:
Coconut oil (it's starting to show up in everyday grocery stores at a reasonable price)
Light-colored olive oil
Essential oils(can be found at craft stores like Michaels. Use a 50% off coupon that they provide each week and it will only cost around $2 per bottle!)
Mason Jars
Red food coloring liquid or gel should be fine. If you're using liquid, add the olive oil after the food coloring to the red batch so that you can reach the desired consistency.
For a one-pint jar, use the following as a guide:
First, melt two tablespoons of coconut oil until it is liquid. Wait for it to cool to room temperature and add two cups of sugar before the coconut oil becomes solid. Next add 2-3 drops of essential oil and five tablespoons of olive oil. Stir, and divide into two bowls. To one bowl, add drops of food coloring while stirring until desired consistency is reached. Finally, start pouring the mixture into layers in your mason jar.
This scrub smells great, exfoliates well, and makes a great gift. The best part, however, is the fact that it uses natural, simple ingredients without the chemicals and toxins found in most beauty products.
Subscribe to:
Posts (Atom)